How to loosen pedals that are too tight: tricks to remove them without damaging the crankarms
Changing pedals is usually one of the simplest mechanical tasks we can do at home. The problem arises when we insert the wrench, apply force, and it doesn't move even a millimeter. A pedal that has been installed for years, a thread without grease, or simply excessive tightening p can turn a five-minute task into a real battle.
Can't remove the pedals from your bike? These tricks work when they are stuck
If you simply have doubts about how to disassemble pedals and which way to turn, in this guide we explain step by step how to change the pedals of any bicycle. Here we go a little further: what we can do when the pedal is so tight that it seems impossible to remove it.
Before applying force, check that you are turning in the right direction
It seems too basic, but it's the first thing we should check before grabbing a larger wrench. The two pedals use different threads precisely to prevent them from loosening during use.
Looking at the bike from each side:
-
Right pedal, drivetrain side: loosens counterclockwise.
-
Left pedal: loosens clockwise.
A simple way to remember this is to think that, to disassemble them, both pedals turn towards the back of the bike when we work with a wrench on the faces of the axle.
It becomes less intuitive when the pedal only allows an Allen wrench to be inserted from the inner face of the crank. Changing our point of view can easily lead to mistakenly tightening even more what we intended to loosen.
The tool can be more important than our strength
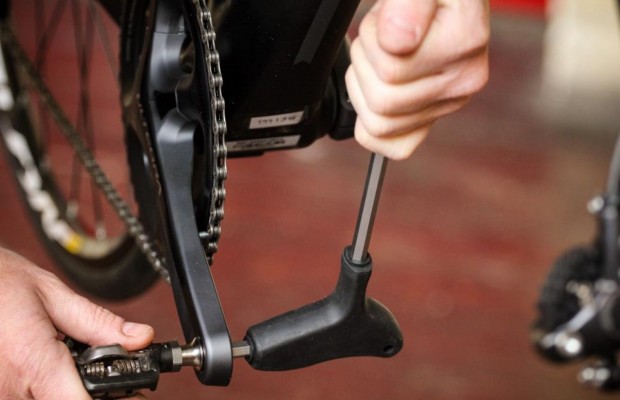
Before resorting to drastic solutions, it's advisable to use the right tool. Depending on the pedal, we will usually need a specific 15 mm pedal wrench or an Allen wrench, typically 6 or 8 mm depending on the model.
If the axle has faces for a pedal wrench, a long and rigid tool makes the job much easier. A small multi-tool that we carry in our jersey can work perfectly for mounting or dismounting a pedal that is in good condition, but it offers very little leverage when faced with one that is really stuck.

It is also important that the tool is well fitted into the thread. If an Allen wrench is only partially inserted and we start applying great forces, we can round off the hole in the axle and turn a relatively simple problem into a much more serious one.
Position the cranks correctly to multiply the force
The difference between struggling for ten minutes with a pedal and managing to loosen it in seconds can simply be in how we position the wrench and the cranks.
What we need is leverage. The greater the distance between the point where we apply force and the pedal axle, the greater the torque we can exert with the same effort.
Therefore, with a particularly stubborn pedal, it is advisable to use a long wrench and find a position where we can apply our body weight in a controlled manner. With certain pedals, it is even more effective to place a foot on the pedal or hold the opposite crank while pressing on the tool.
In these cases, it is usually preferable to work with the bike firmly supported on the ground rather than suspended on a work stand. This way, we can stabilize it much better and take advantage of our weight.
And there is one especially important precaution: place the chain on the large chainring. If the pedal finally gives way suddenly, our hand can end up directly against the teeth of the chainring. Covering them with the chain significantly reduces the chances of ending up with a good cut.
More leverage, but wisely
If a conventional wrench is not enough, the next resource is to increase its length.
A long pedal wrench allows for much more torque than a short tool. There is also the classic trick of extending a sturdy wrench with a tube, although here we enter a territory where it is advisable to take extra precautions.

A huge lever allows for surprisingly high forces to be generated. The pedal may come off, yes, but we can also damage the tool's fitting, the axle, or even the crank itself if the situation is extreme.
Before reaching that point, it is worth trying another, less aggressive method.
A penetrating oil can do the work for you
When a pedal has been mounted for a very long time, the problem doesn't have to be solely that it was tightened too much. Moisture and the passage of time can promote corrosion between the threads and make the connection practically blocked.
In that case, we can apply penetrating oil to the area where the pedal axle enters the crank and let it act before trying again.

You don't have to expect an instant result. If the pedal is really stuck, letting the product act for a longer time can be much more effective than continuing to increase the force without rest.
Afterwards, we reposition the wrench correctly and try again, taking advantage of the entire length of the tool.
Small taps can also help
Another possibility is to apply dry and controlled taps on the end of the wrench, preferably with a rubber mallet or a tool that does not directly damage the wrench.
The idea is not to hit the crank or the pedal uncontrollably. These small impacts can help break the union caused by corrosion and get the thread to start moving.
As soon as we notice the first movement, we stop using force methods and continue unscrewing normally.

And applying heat?
Heat often comes up among the methods for disassembling stuck metal joints and can work because different materials expand differently. In a common combination of aluminum crank and steel axle, carefully heating the threaded area can help release a stuck connection. BE CAREFUL if your crank is carbon; applying heat can damage it.
However, it is not a technique we recommend as a first option on a modern bike. Excessive heat can affect the finish of the crank and nearby components, and the situation requires even more caution if we are talking about carbon components or if we have previously applied flammable products.
If we have reached the point where we are thinking of applying a lot of heat or disproportionate force, it is probably wiser to move on to the last step.
There comes a time when it's worth stopping
If the pedal continues to not move after using a good tool, penetrating oil, and a reasonable amount of leverage, continuing to increase the force can be costly.
Especially if we start to observe that the Allen fitting is rounding off, the wrench is slipping, or the crank is starting to suffer, it is better to stop.
A workshop has long tools, specific useful items, and, above all, experience disassembling much more stuck components. Removing a pedal has a solution; repairing a damaged thread in a carbon or aluminum crank can be much more complicated and expensive.
The best trick is to prevent it from happening again
Once we have achieved our goal, it is worth taking a minute to avoid repeating the experience.
We must clean the threads of the pedal and the crank and apply appropriate grease before assembly. This is not just a mechanic's recommendation: manufacturers like Shimano explicitly state that grease should be applied to the thread to prevent the pedal from getting stuck.
We should also forget about the method of "tightening as much as we can." Pedals need a firm tightening, but we must always respect the torque specified by the manufacturer. As a reference, Shimano sets 35-55 Nm for many of its pedals, while LOOK, for example, specifies 25 Nm for its X-Track and 40 Nm for the Kéo, so there is no universal figure valid for any model.
With the thread clean, properly lubricated, and the correct torque, the next time we have to disassemble the pedals, we will probably rediscover that this operation should actually take just a few minutes.
También puede interesarte
 Bike Equipment
How to change the pedals of any bike in 5 steps
 Gravel
The Megamo West 2027 gets a new range from €2,399 and remains a great choice
 Road
Road
The new cycling regulations in Spain are here: everything that changes from 1 October (this Thursday)
 Road
Road
What do the colours of the rainbow jersey mean, and who was the first World Champion?
 Road
Road
How much prize money does La Vuelta 2026 offer? Here’s what Enric Mas has earned and how it compares with the Tour and Giro
 Training
