How to correctly place the levers on your road bike
The correct adjustment of the rider's contact points on the bike is essential to achieve a comfortable and efficient position when riding. It is the starting point that has to be perfectly positioned before making any other biomechanical adjustments. Today we are going to see how to position the levers correctly.
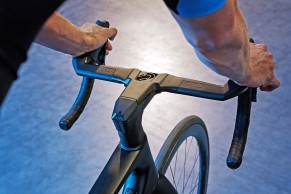
Levers always at hand
Cycling has earned a reputation as a tough sport, not only because of the effort it demands, but also because of the implications of spending many hours on the bike, which traditionally resulted in various other complaints that ended up affecting cycling performance to a greater or lesser extent.
As far as the levers are concerned, these problems often take the form of pain in the hands, wrists and arms or numbness in the fingers, which can result in dangerous situations as they do not allow us to have all the necessary feel and control over the element that steers the bike.
Evolution of ergonomics
RECOMENDADO

When do helmets have to be changed? Do they have an expiration date?

The best apps for cycling and mountain biking

Black Friday Garmin 2025: the ultimate guide to choosing your GPS at the best price
How to wash your cycling clothes? 10 keys to make them always look new

Cycling can help you fight the effects of the time switch

Easy to apply tips for riding faster
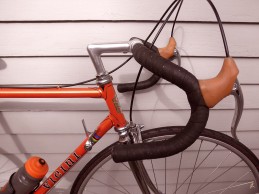
Traditionally, road handlebars had a greater reach and drop. This meant that the differences between the three possible grips were very pronounced. So on classic bikes, just look at old photos, the grip on the horizontal part of the handlebars was widely used except when the speed was very high or the rider was standing on the pedals.
On these handlebars, the levers, with their much shorter controls, were located in the middle of the curve of the handlebar, creating a difference in height between the horizontal and the grip point where the hand was fitted. A position which, however, was generally impractical when riding, being used almost exclusively when the rider got out of the saddle.
In recent years, the ergonomics of groupsets and handlebars have changed completely, seeking to adapt more naturally to the rider's body and placing the rider in a more efficient position.
This is why the so-called compact handlebars, as a definition of their reduced reach and drop, have been taking over the market. The width of these handlebars has also been reduced compared to the traditional paradigm of using the width of the shoulders as a reference, now the use of narrower models is prioritised in order to favour aerodynamics.
In the case of the levers, the integration of shift levers from the mid-1980s onwards meant a considerable increase in size compared to the smaller brake levers of the classic bikes. However, they continued to maintain a curved shape adapted to the still common wide handlebars, so that the ergonomics, despite having a better grip surface, changed little.
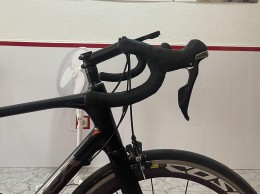
The reduction in the size of the levers made possible first by the improvement of components and later by the arrival of electronic groupsets, together with the introduction of compact handlebars and an evolution in the science of biomechanics, gave the brands new arguments for redesigning the ergonomics of the grip.
There was a move to flat surface levers that were integrated into the shape of the handlebars as an extension of the bars. In addition, the shorter dimensions moved the main grip from the horizontal part to the handlebars, where we now spend most of our time gripping the handlebars.
At the same time, the levers are shorter to accommodate the lower drop of modern handlebars and are designed to operate the brakes with one or two fingers as today's brakes do not require as much force to generate the necessary stopping power.
Everything in its right place
Before starting to place the levers, it is a priority that the handlebars are correctly positioned, with the lower part parallel to the ground or with a slight upward inclination. It is common to see bicycles, even when fitted as standard, in which this area is placed with a very pronounced inclination, trying to provide a more comfortable position in the grip on the levers but which, however, destroys the grip in the curve by moving the levers away to an unreachable point for the fingers.
With the handlebar properly fitted, slide the clamps along the handlebar and with the rubber grip in position, not folded down to access the clamp, check that the location of the clamps is positioned as an extension of the upper section.
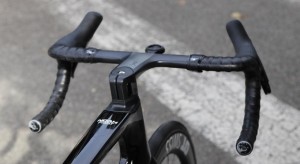
Slightly tighten the clamping screw and check, using the guide lines that are usually included in the handlebars, that both levers are at the same height. If we have a turbo trainer or any other fixing system that allows us to keep the bike completely straight, we will use it so that we can place a bubble level between both levers and check that both are at the same height, as the reference lines are not always printed with the necessary precision.
Before fixing them definitively, we must decide on the angle of the handlebars. It is usual to wear them straight as an extension of the shape of the handlebars. However, in recent years, for aerodynamic reasons, it has become fashionable at competition level to place them towards the inside, allowing a more closed wrist position. This is a matter of personal taste, although you must bear in mind that if you close them too much you run the risk of not being able to reach the brake lever properly.
Final adjustments
After fixing the levers definitively to the handlebar, tightening them to the specified value indicated by the handlebar manufacturer, usually 5 Nm, we only have to check that the position of the grip is natural, and we can vary the inclination up or down a few degrees so that the wrist adopts a more natural position. Bear in mind that if the lever is too flat we will be forced to overextend the joint and if they are too high we will suffer the same effect when we stand up.
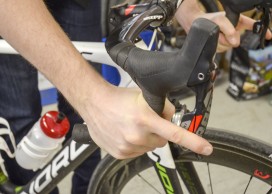
We must also check if we can reach the brake levers correctly when we hold down and, if not, play with the position adjustment that the levers have and that allows us to reduce the distance from the handlebars. Bear in mind that reducing the distance may force you to adjust the brake adjustment, in the case of pad brakes, or the contact point adjustment if you use hydraulic discs, so that they start to act where you want them to and with the feel that you feel most comfortable with.
The case of gravel handlebars
The arrival of gravel has popularised a new type of handlebar adapted to this discipline whose most outstanding feature is a pronounced flare. This means that the lower part and the part of the curve open outwards to provide greater stability when we hold on to this area on downhill sections, while the upper area maintains a conventional width for riding without changing our usual position.
The problem with these handlebars is that sometimes the flare is so pronounced that it completely spoils the ergonomics of levers designed for the typical road handlebar and forces us to hold them almost sideways, having to open our wrists wider to operate the brakes or gears.
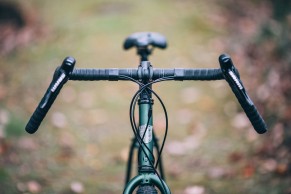
On these handlebars it is even more important to find the right point of inclination towards the inside of the levers. As we mentioned earlier, it is a matter of being observant and checking that when we are holding on to them, our wrist is in the most natural position and at the same time we can reach the levers without any problem.
An adjustment that is rarely taken into account and is the necessary starting point before going on to solve other biomechanical problems.