How to calculate the correct saddle height
Adjusting the saddle height of your bike in the correct way is a parameter that brings headaches to many and that influences in an essential aspect when it comes to achieve a good pedaling.
Calculate the perfect saddle height step by step
You don't have to be too observant to notice that many cyclists ride with an inadequate saddle height on any given morning while pedaling on our usual roads. In most cases, the saddle is usually low, although there are also those who are erring on the side of excess.
Incorrect adjustment of the saddle position means, in the best of cases, that we are not taking full advantage of the force generated by our legs, and in some cases it can even be the origin of various discomforts and even injuries.
RECOMENDADO

How to lose body fat? Differences between losing weight and losing fat
When must the tubeless tire sealant be replaced? What quantity?

The real importance of signing up for a race

Don't overlook your nutrition when training in cold weather
The best apps for cycling and mountain biking

25 cycling gifts ideas to get it right
We will explain how to achieve a reasonable approximation of the correct saddle position for you. However, this form of adjustment is based on mere statistics and does not take into account the personal characteristics of each rider.
A perfect fit can only be achieved through a biomechanical study that dynamically analyzes our pedaling while quantifying the ranges and angles at which the ankle, knee and hip joints move with each turn of the cranks. If we do not have access to a study of this type, we can always resort to specific applications developed to perform these calculations from your own cell phone.
1. Measuring the inseam length
The traditional method of saddle height adjustment is based on a statistic that relates rider leg length to saddle height. Like any statistic, it fits reasonably well with individuals who are in the average but fails with those who fall outside it, in this case, those riders with particularly long or short legs relative to their height.
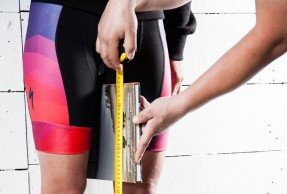
The first step is to obtain the measurement of the leg for which, we will place ourselves with our back against the wall and legs apart with the width of the hips. We will place a book between the legs, pressing slightly upwards and, finally, we will measure the distance between the top and the floor, taking care to do it vertically so as not to falsify the measurement.
2. Calculate saddle height
The obtained data will be multiplied by 0.883, which will give us the saddle height that we must transfer to our bike.
As we explained before, this ratio is based on the statistical study of hundreds of cyclists. However, although it does not exactly fit our characteristics, it is a good starting point to achieve the correct positioning.
3. Measuring the saddle height on the bike
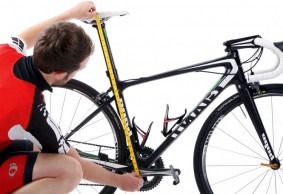
This is one of the points that seems simpler than it really is. It is not enough to take the tape measure and measure the distance between the center of the bottom bracket spindle and the saddle. There are two factors that are often overlooked that influence the measurement we transfer to the bike.
First, place one end of the tape exactly in the center of the bottom bracket, something that is not so easy with some crank models that have a large gap in this area so, in some cases, it may be necessary to use a small cardboard template on which to mark the exact center position.
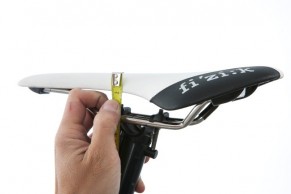
The other source of error in the measurement is the point on the saddle where the measurement is taken, since taking a point further forward or backward as a reference can cause the measurement to vary significantly.
There is usually a more or less general consensus in using the middle of the saddle as a reference, so first we will measure the length of the saddle and mark the point, you can use some tape to do so, which will be the one we use as a reference to take the measurement from the center of the bottom bracket.
4. Adjusting the saddle height
Loosen the seatpost clamping bolts and move it a little to release it from its position. In models where the clamping is done with a wedge integrated in the frame, it may be more complicated to release the seatpost having to help us with a rubber hammer with which we will hit gently, upwards, the saddle.
We can take advantage of the fact that we have freed the seat post to remove it and clean it together with its housing. In this case, care must be taken so that the fixing wedge does not fall into the frame and, in the case of using the electronic group with the battery in place, carefully remove the cable.
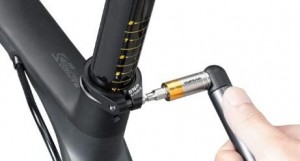
After cleaning the assembly, we will apply some antifriction paste and return it to the frame, already in the position we have calculated.
Finally, we will tighten the fixing screw using a torque wrench that we will adjust to the torque indicated by the manufacturer, usually 5 Nm, although it can vary.
5. Fine adjustment of saddle height
As we indicated at the beginning, this measurement that we have obtained is only an initial adjustment point. The next step is to adapt this height to our specific characteristics.
The first step is to check that the saddle lag is correct. Traditionally this has been done by checking that the knee, in the most forward position, i.e. with the cranks horizontal, is vertical to the pedal axis. To do this, a plumb line is pulled from the pivot point of the knee to check how far it moves relative to the pedal.
However, detecting the pivot point of the knee is not easy, so a good approach is to drop the plumb bob from the knee so that it falls in front of the axis.
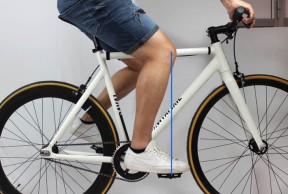
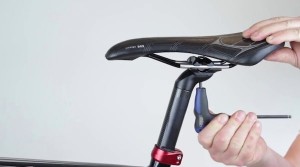
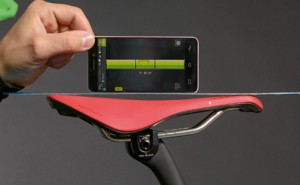
Loosen the clamping bolts at the head of the seat post to move it to the proper position, and then tighten them again. At this point, it is important to check that the saddle has the correct inclination, for which we will use a spirit level. Ideally, the saddle should be completely horizontal or with the tip slightly inclined downwards, which helps to relieve pressure on the lower part of the legs.
Finally, we come to the empirical part of the process in which we will have to pedal the bike to check the fit. Obviously, we will use a bib shorts and the shoes that we usually use.
It is not enough to do 100 meters on the bike, we will ride a couple of kilometers on a flat area where we can pedal evenly and we will look at several aspects. The first of them, the flexion up and down that makes the ankle. Ideally, the heel should remain slightly elevated with respect to the point where the shoe meets the pedal, lowering slightly when we press the pedals but without dropping below the horizontal. In the recovery part of the pedal stroke the heel will rise slightly.
If we pedal with the heel too high, it may be a sign that the saddle height is too high, while if the heel falls below the horizontal, it is more likely that we are riding too low.
As well as the heel, it is important to pay attention to the angle of our knees. We must stretch the leg but maintain a slight flexion in the lowest part of the pedal stroke. Obviously this parameter is difficult to quantify, so we will have to evaluate it together with the movement of the ankle. What we cannot overlook is the case where the knee is fully extended, indicating excessive saddle height, which must be corrected by lowering the saddle slightly.
Other sensations that we have to take into account when making the final adjustment of the saddle is our placement in the saddle during pedaling. If we sit behind the optimal saddle support point, we should set the saddle back a bit, as well as if we tend to sit towards the tip of the saddle. When modifying the saddle setback, keep in mind that if we move the saddle forward we should also raise it slightly so that it is at the correct height, and conversely, lower it.
If the position is correct, our hamstrings will rest stably on the back of the saddle, the pressure we feel in the groin will be minimal and in no case should it cause numbness.
In any case, any modification we make in this fine-tuning phase, both in saddle height and lag, will be very small, just a few millimeters, to test until we find the optimum point. It is a laborious process in which we must be patient.
With this process, we can adjust the saddle height to very close to the ideal for our characteristics although, as we mentioned at the beginning, in no case can it replace the expert eye of a biomechanist and the measurements taken by means of modern motion capture systems.